
Truly overkill for ANY purpose. But still fun as hell. 😀
Truly overkill for ANY purpose. But still fun as hell. 😀
Trash. This kind of thing boils my blood. Why would any company pay, quite handsomely might I add, to use software that can not be controlled once installed? This isn’t some cloud hosted app or service, this is Windows Server. That customers run on THEIR OWN HARDWARE. Possibly in a secure enclave, who knows? Why should Microsoft need telemetry data about how customers are using this in private environments? Why is it sent online, why isn’t it gathered and shared when a support case is needed? Why can customers not opt out entirely?
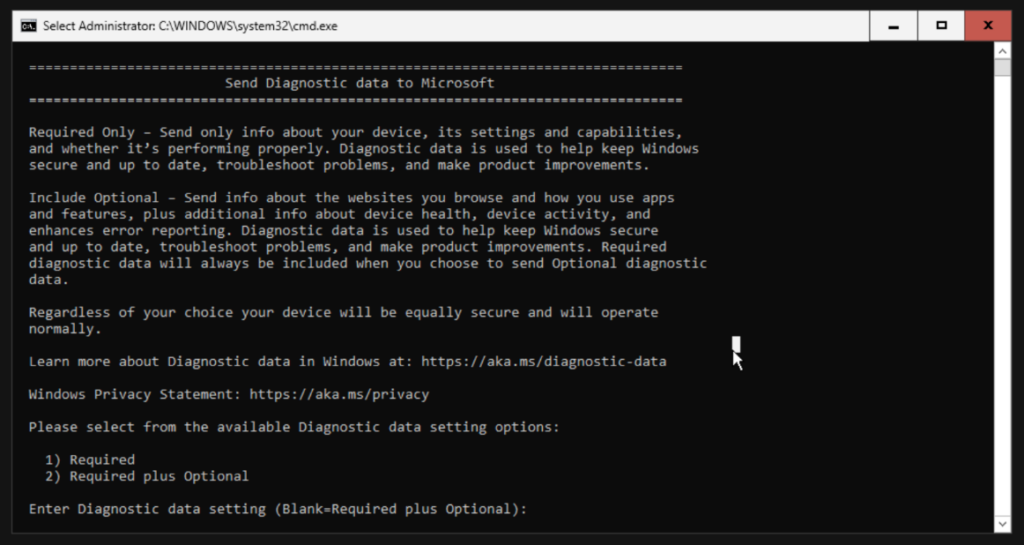
The real kick in the teeth is that last line. You didn’t read and just clicked enter? Boy, oh boy! Guess what, you just gave Microsoft your browsing history! Information about all your apps, all your usage activity, everything.
PSA: I work at Microsoft. I focus on Cloud. I understand many services gather telemetry data to ensure they’re not being abused, are operating correctly, and users are getting what they paid for. This, however, is not the same. Windoze is not my thing, I don’t get paid on whether customers use it or not. I will help customers use it if they must, but otherwise I focus on software that respects user privacy. Some day my words will probably get me fired, but outspokenness regarding the missteps by the other areas of the company is just one way that I demonstrate to my customers that I have their best interest at heart. Sorry, boss! </grin>
I wanted to book a reservation at one of my favorite restaurants (well, it USED TO BE a favorite, not anymore!) until I saw this nonsense:
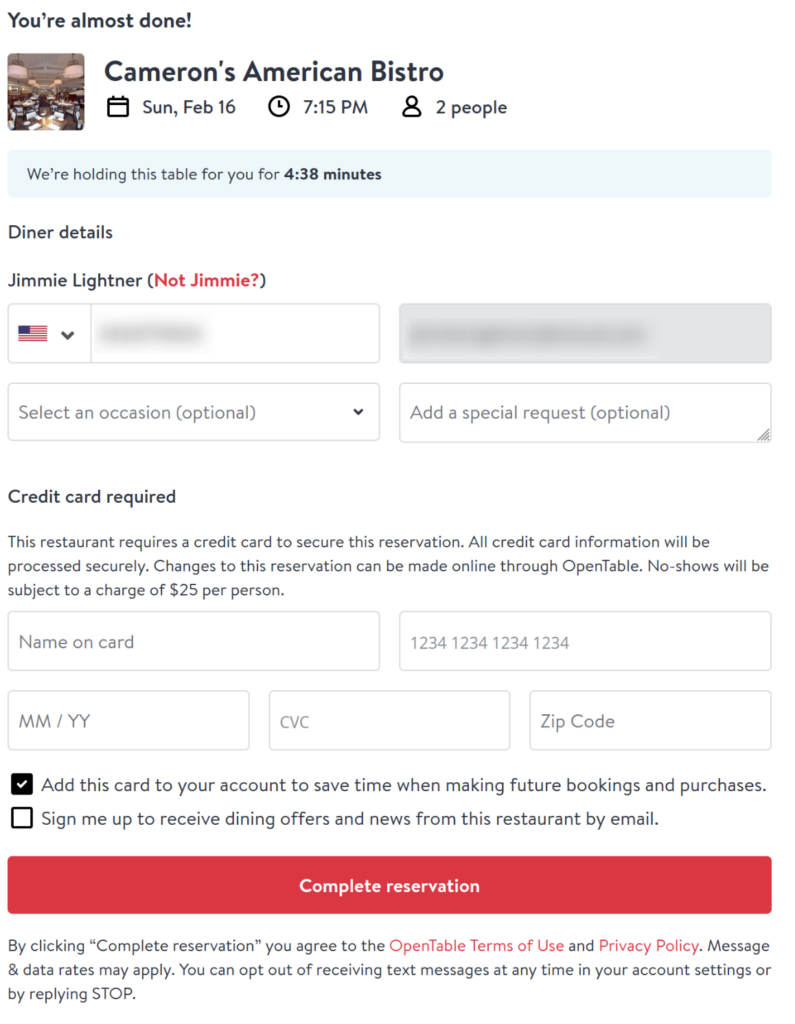
I don’t know if this is some new thing from OpenTable or if Cameron‘s is just having issues with people not showing, I don’t care. Regardless, I will never consent to this. Forcing your guests who intend to show up for their reservations divulge personal information to a third party in order to offset the cost of those guests who do not make good on their reservations is unacceptable!
You’re off the list. Goodbye, Cameron’s!
Edit: I spoke with the restaurant, and while they were aware of this new practice – they were unhappy with it as well! They said Cameron Mitchell themselves (the restaurant is part of a local restaurant group) forced this for all reservations on the holiday weekend. See: https://cameronmitchell.com/ for other restaurants likely practicing this behavior. If you want to call to voice your opinion on this matter, their phone number is +1 (614) 621-3663.
Just got off the phone with Lexi at UniTel who was absolutely unbothered by the fact I was able to log in to someone else’s account. It turns out if you visit https://www.unitelcustomer.com/process-password-recovery-token.php and click Submit, you’re able to reset another user’s password without entering anything! I was able to not only log in, but also view PII ( Name, Address, Phone, Email ) of some dude and his business in Alaska.

I wrote him an email and Cc’d UniTel’s support team. As for their service, I will not be signing up. Yikes!
If you’re struggling to log into AVD from a Windoze… ahem, Windows computer with your CAC card… here’s the likely culprit: Update KB5046740.
From this thread on Reddit, it seems like quite a few others have been running into the issue. I tripped over it this morning, myself. It’s a quick easy fix assuming you have administrative ability to remove the update from your own machine.
Hit up an administrative command line and drop this command:
wusa /uninstall /kb:5046740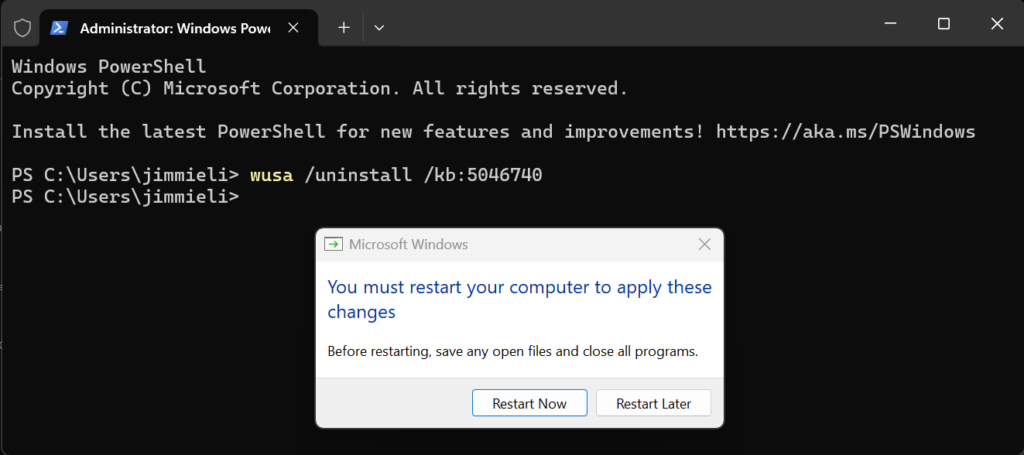
Reboot, and try logging in to AVD again! With any luck, you’ll at least be functional until the update is reinstalled. 😛
The upgrade of qemu packages from 9.1.0-2 to 9.1.1-1 broke the audio output of my Windoze 11 VM that I typically work from. Arch Linux is a rolling release, so it’s not as easy to just specify the version of a package you want to install using any of the normal commands with Pacman – it will try to install / reinstall the latest version available. This means it’s time to downgrade from the pacman cache! Since this upgrade just happened, the packages should still be available. Let’s take a look!
cd /var/cache/pacman/pkg
sudo pacman -U qemu-*9.1.0-2-x86_64.pkg.tar.zst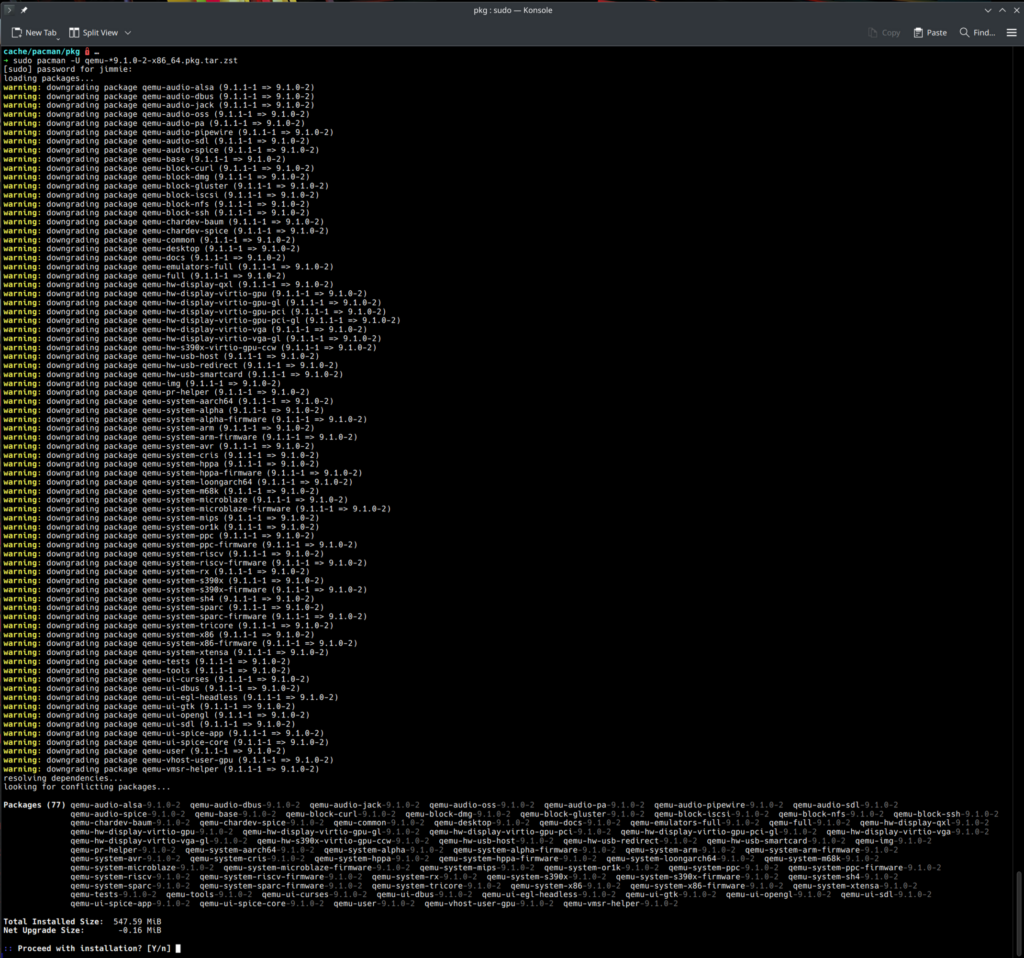
Once complete, Windoze and Teams were back to squawking like an annoying parrot you just can’t shut up.
Ongoing discussion of this bug here: https://gitlab.com/qemu-project/qemu/-/issues/2639
It’s no secret that I’ve fallen out of love and into a constant state of disgust with “Big Tech.” Apple, Google, Microsoft, Amazon… they all do repulsively shady things that make me want to swear off tech, sell every gadget I own, and become some kind of Amish hipster. Okay, okay, that might be a bit far – but THIS one is particularly cruddy. If you want to be pissed off, too, go read this: https://cybernews.com/security/google-pixel-9-phone-beams-data-and-awaits-commands/
TL;DR – It’s time to cut these numbskulls out of our lives. Take your data and put it somewhere you control. And if you happen to have one of these phones, check out https://grapheneos.org/
Sometimes I forget …
This isn’t “normal” for most other people.
Today marks the first time I’ve updated the BIOS in my Laptop since I bought it. When I initially powered it up, Windows 11 was “installed” (more like present, it took almost 2 hours for it to fully update itself before it was usable) so I used that to update the BIOS and various firmware the first time around. Shortly after that process was complete I formatted the drive and installed Arch Linux. Goodbye, Windoze!
The only problem with running Linux on a piece of hardware from Dell is that sometimes they don’t support anything other than crummy Windows BS.
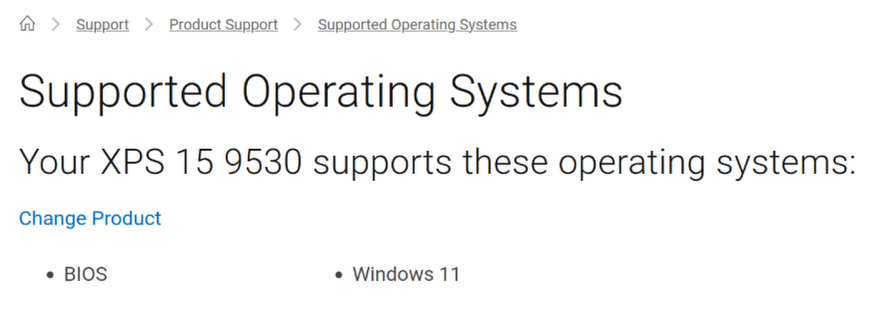
This would typically leave users in a predicament when needing to do things like update their Firmware or BIOS with the latest versions. Luckily there’s a handy platform called Linux Vendor Firmware Service for things just like this! Most of the hardware in the machine supports being updated via this platform, but sadly, my system itself is not listed on the Device List. So while I can update my trackpad, fingerprint reader, USB hubs, and many other devices firmwares, I can not update the BIOS natively within Linux. This was disheartening, as I am not about to reinstall Windoze or make a DOS boot disk just to flash a BIOS update. While poking around on their support website, I came across this little gem:
All Dell systems from 2015 and later support flashing an updated BIOS from within the boot menu. Note: the BIOS flash ends in an .exe extension. Even though Linux cannot open it natively, the BIOS will deal with it properly.
Huzzah! Apparently, to update the BIOS, all you have to do is download the .exe file and stuff it onto a FAT32 formatted USB drive. Boot the computer while connected to power, mash F12 to get the One Time Boot menu, and leverage the handy option to Update BIOS. I can confirm this worked perfectly! Click for Detailed instructions
I wrote a blog post a short while back about why I loved Linux. I waxed nostalgic for a while about my history with the OS and how it impacted my life. In the same post, I talked about my then-current setup utilizing a MacBook Pro, but I managed to get a bit off track toward the end, ranting about Apple’s ever-ongoing dumbing down of Mac OS, surveillance of user activities, strangle hold on developers – as well as the general lack of open-firmware alternatives for mobile hardware. When I wrote that post, I was certain I wouldn’t compromise or accept a replacement for my current machine until all of the conditions I was looking for were met…
I compromised. Sadly, there is no perfect device yet. There are, however, some REALLY AWESOME devices that get pretty damn close to the pin. I consider last year’s Dell XPS 15 9530 to be one of them. Sure, it’s got some closed-source firmware and wacky audio amplifier issues, but it’s a beast with kick-ass battery life, a beautiful screen, and great build quality.
I had no intention of buying a new notebook this year, but it just sort of happened. While trying to focus and work through some AVD nonsense for a customer, my LG monitor began to flicker slightly. I tried to ignore it, but after a couple of hours it was starting to become more bothersome and my head and eyes began to hurt. After several attempts at resetting, unplugging and plugging back in, checking firmware and cables and etc., I finally gave up. There was no way I would be able to finish the work I needed to like this, so I accepted defeat and drove over to Microcenter to buy a new monitor. I should have known the danger waiting for me; every time I walked into that store in the past I’ve come home with something… additional. This trip was no different.
While ogling the new monitors and trying to decide between OLED or IPS, I noticed I happened to be standing right next to the notebook section… of course my eyes wandered. You know you’d look, too. After I settled on an open box Dell U4025QW, I turned my attention to the laptops. I was immediately drawn to the XPS 15. I’ve had an XPS 15 before, but that was years ago when Microsoft still sold them at their retail stores (RIP). The new model has a gorgeous OLED display driven by an RTX 4070, 32 gigs of ram, and a 20 core i9 processor… it didn’t take long for me to convince myself, or the sales guy, that I needed it.
I still had work to do once I got home. I put the new laptop in the kitchen so it was out of sight and out of mind (hey, I tried) while I wrapped up my tasks for the day. The second I was finished with work, though, I dove into the deep end setting up my new machine.
I pressed the power button. The OLED screen displayed a blazing white Dell logo in the center of a perfectly dark black expanse… I drooled. Seconds later I was greeted by the Windows 11 setup screen. It had been a long time since I’ve set up Windows. Wow, it’s total garbage these days. It took forever to get through OOBE. Updates, reboots, more updates, ads and offers, ugly start layouts, more ads… What a mess. Had I not wanted to ensure it had the latest firmware updates from Dell, I would have skipped the Windoze shenanigans entirely. Sadly, most people seem to run Windows, so Dell provides the best support for updating using that platform. Once I confirmed my system was fully patched and ready, the real fun began.
I grabbed my favorite thumb drive and dropped the latest Arch Linux ISO onto it. I just wanted to test Linux on this hardware, so I wasn’t particularly thorough in choosing secure options during the install (encryption could wait until I knew the thing would even boot). I’m still in shock. Not even a full ten minutes later, I was sitting at the KDE Plasma desktop. Amazingly, everything appeared to “just work” right out of the box! I’ve never had a machine this easy to install Linux on. That’s when things got a bit more serious: I realized Microcenter had a 14 day return policy for this machine. I had 14 days to decide if I was keeping this thing and I was going to make it – and Linux – my daily driver for the next two weeks. I would give it everything I had to finally ditch Mac and Apple’s ever evolving circle-jerk of bullshit.
That was 30+ days ago. I’m sitting here typing this post from the XPS. I sold the Mac to a buddy and ended up back at Microcenter to buy 64 gigabytes of RAM and a 4TB Samsung 990 Pro NVMe SSD to trick this machine out. I’ve reloaded Arch a couple of times to rectify some of the poor initial decisions (hello, LUKS), but have finally settled on a stable, maintainable install that I am satisfied with. Without Microsoft, Apple, or Google spyware.
